Kubernetes Response Engine, Part 8: Falcosidekick + Flux v2
This blog post is part of a series of articles about how to create a
Kubernetesresponse engine withFalco,Falcosidekickand aFaaS.See other posts:
- Kubernetes Response Engine, Part 1 : Falcosidekick + Kubeless
- Kubernetes Response Engine, Part 2 : Falcosidekick + OpenFaas
- Kubernetes Response Engine, Part 3 : Falcosidekick + Knative
- Kubernetes Response Engine, Part 4 : Falcosidekick + Tekton
- Kubernetes Response Engine, Part 5 : Falcosidekick + Argo
- Kubernetes Response Engine, Part 6 : Falcosidekick + Cloud Run
- Kubernetes Response Engine, Part 7 : Falcosidekick + Cloud Functions
Today, we will set up another KRE (Kubernetes Response Engine) based on Flux (version 2). If you don't know about Flux (version 2), let me explain it in a few words. Flux (version 2) is a tool for keeping Kubernetes clusters in sync with configuration sources (such as Git repositories) and automating updates to the configuration when new code is available to deploy.
To learn more about Flux (version 2), see Flux Documentation.
Flux (version 2) might look like a GitOps tool. It is, in reality, another GitOps tool in that it watches Github repositories for configuration changes and keeps the current state and the desired state always in sync. It does that on top of Kubernetes by using a bunch of CRs (Custom Resources). However, unlike Knative Eventing, Tekton Triggers, and Argo Events, Flux (version 2) does not support an eventing system to forward events from one point to another.
To set up KRE with Flux (version 2), we will create a small project that listens to events and updates the GitHub repository, which Flux (version 2) monitors to alter the desired state. For example, get the event of a pwned pod, then change its replicas to zero within the deployment YAML file.
The reference architecture given below illustrates the content of this blog.

Table of Contents
Prerequisites
- minikube v1.21.0
- helm v3.6.2+gee407bd
- kubectl v1.21.1
- ko v0.8.3
- flux v0.16.0
- gcloud v347.0.0
Tutorial
Provision local Kubernetes Cluster
$ minikube config view
- cpus: 3
- driver: virtualbox
- memory: 8192

minikube start
Install Flux V2 - GitOps Toolkit
I highly recommended that you check out getting started page of Flux (version 2). It gives you detailed installation instructions for Flux (version 2).
For Flux (version 2) to create a GitHub repository for its resources, we must define the token and username information. Then, Flux (version 2) installed in a GitOps way, and Flux (version 2) will push its manifest to the repository.
export GITHUB_USER=<username>
export GITHUB_TOKEN=<token>
Once the necessary environment variables are defined, we can install Flux (version 2). The following command will create and push its manifests to the repository, then install Flux components.
flux bootstrap github \
  --owner=$GITHUB_USER \
  --repository=fleet-infra \
  --branch=main \
  --path=./clusters/my-cluster \
  --personal
After the installation is complete, the next step is creating the alpine GitRepository and Kustomization CRD's (Custom Resource Definitions). For more information, see components.
Apply the CRD files as follows:
$ kubectl apply -f https://raw.githubusercontent.com/developer-guy/kubernetes-response-engine-based-on-flux-v2-gitops-toolkit/master/alpine-gitsource.yaml
gitrepository.source.toolkit.fluxcd.io/alpine created

$ kubectl apply -f https://raw.githubusercontent.com/developer-guy/kubernetes-response-engine-based-on-flux-v2-gitops-toolkit/master/alpine-kustomization.yaml
kustomization.kustomize.toolkit.fluxcd.io/alpine created
Alternatively, we can use the Flux CLI.
To create GitRepository:
flux create source git alpine \
    --url https://github.com/developer-guy/desired-state-repository \
    --branch master \
    --interval 30s
To create Kustomization:
flux create kustomization alpine \
    --source alpine \
    --path "./" \
    --prune true \
    --validation client \
    --interval 5m
Install falco-event-listener
As the name suggests, this program will listen to an event in the form of CloudEvents. This CloudEvents forwarded from Falcosidekick, a simple daemon for enhancing available outputs for Falco. After the successful receipt of the event, falco-event-listener will update the YAML definition to scale its replicas to zero based on the pieces of information given in the event.
In most basic form, the architecture of the demo is:
Falco w/HTTP --> Falcosidekick w/CloudEvent --> falco-event-listener w/HTTP --> GitHub
To learn more about CloudEvents, see cloudevents.io.
First, let us clone the falco-event-listener repository.
git clone https://github.com/developer-guy/falco-event-listener
cd falco-event-listener
Before installing this project, we have to do a couple of things.
- We have to create a GitHub PAT (Personal Access Token) to be able to update the desired state configurations which are in the GitHub repository after we detect a malicious behavior related to our pod has detected.
As you can see in the above arguments, we should pass GITHUB_TOKEN as an argument to our CLI application. The best option is storing GITHUB_TOKEN in a Kubernetes Secret and using Secret as environment variables.
kubectl create namespace falco
kubectl create secret generic github-secret \
         --from-literal GITHUB_TOKEN=$GITHUB_TOKEN \
         --namespace falco
- You might notice that we are using some URLs (--notify-url) within the flags of the project. Let me explain that why we need it a bit. As you might know, we are trying to set up some remediation engine here, so we have to react to those events thrown by the Falcosidekick as soon as possible. We defined an interval while creating a
GitRepository,which means thatFlux (version 2)will wait at least that long to sync configurations, so we have to notifyFlux (version 2)controllers about changes once we edited the desired state by a process whose name isfalco-event-listener.To notify theFlux (version 2)controllers about changes in Git or Helm repositories, we can set up webhooks and trigger a cluster reconciliation every time a source changes. For more detail, please see.
There are different kinds of webhook receivers in Flux (version 2), but we'll use the generic one in this guide.
const (
	GenericReceiver     string = "generic"
	GenericHMACReceiver string = "generic-hmac"
	GitHubReceiver      string = "github"
	GitLabReceiver      string = "gitlab"
	BitbucketReceiver   string = "bitbucket"
	HarborReceiver      string = "harbor"
	DockerHubReceiver   string = "dockerhub"
	QuayReceiver        string = "quay"
	GCRReceiver         string = "gcr"
	NexusReceiver       string = "nexus"
	ACRReceiver         string = "acr"
)
Let us to create a Receiver, to do that we have to a couple of things again:
$ TOKEN=$(head -c 12 /dev/urandom | sha256sum | cut -d ' ' -f1)
$ echo $TOKEN
0babd54d2b64d6d6fcd10a663cb6195773e968ba6642ca8c1a8a54df7b52efd0

$ kubectl -n flux-system create secret generic webhook-token \
--from-literal=token=$TOKEN
secret/webhook-token created

$ cat << EOF | kubectl apply -f -
apiVersion: notification.toolkit.fluxcd.io/v1beta1
kind: Receiver
metadata:
  name: generic-receiver
  namespace: flux-system
spec:
  type: generic
  secretRef:
    name: webhook-token
  resources:
    - apiVersion: source.toolkit.fluxcd.io/v1beta1
      kind: GitRepository
      name: alpine
      namespace: flux-system
EOF
receiver.notification.toolkit.fluxcd.io/generic-receiver created

$ cat << EOF | kubectl apply -f -
apiVersion: v1
kind: Service
metadata:
  name: receiver
  namespace: flux-system
spec:
  type: ClusterIP
  selector:
    app: notification-controller
  ports:
    - name: http
      port: 80
      protocol: TCP
      targetPort: 9292
EOF
This program is basically a CLI application and it uses the following arguments as:
args:
  - "--owner"
  - "developer-guy" # this is the owner of the desired state repository
  - "--repository"
  - "desired-state-repository" # this is the repository which we store desired state configurations
  - "--file"
  - "alpine.yaml" # this is the file that we are going to update
  - "--github-token"
  - "$(GITHUB_TOKEN)"
  - "--notify-url"
  - "http://receiver.flux-system/$(WEBHOOK_URL)"
Let us run our project on the Kubernetes cluster. To do that, we'll be using the ko tool. ko, created by Google, is a simple, fast container image builder for Go applications. For more information, see the official repository of the project.
We'll use Container Registry as an image repository service provided by the Google Cloud to store, manage, and secure our container images. Alternatively, we could also use DockerHub, quay.io, and so on.
export WEBHOOK_URL=$(kubectl get receivers -n flux-system generic-receiver -ojsonpath='{.status.url}')
export PROJECT_ID=$(gcloud config get-value project)
export KO_DOCKER_REPO=gcr.io/$PROJECT_ID
envsubst < falcoeventlistener.yaml | ko apply -f -
If you are using a private container registry, don't forget to create a registry secret to pull and push images. You can follow the following guide to achieve this:
https://colinwilson.uk/2020/07/09/using-google-container-registry-with-kubernetes/
If everything works as expected, we should see an output as given below:
$ kubectl get pods --namespace falco
NAME                   READY   STATUS    RESTARTS   AGE
falco-event-listener   1/1     Running   0          59s
The last step we have to do is installing Falco and Falcosidekick with configuring Falcodekick to forward events to our application.
Installing Falco and Falcosidekick
For an up-to-date and detailed guide to installing Falco and Falcosidekick, see falcosidekick).
Let us enable CloudEvents support of Falcosidekick.
helm repo add falcosecurity https://falcosecurity.github.io/charts
helm repo update
helm upgrade --install falco falcosecurity/falco \
  --namespace falco \
  --set falcosidekick.enabled=true \
  --set falcosidekick.webui.enabled=true \
  --set falcosidekick.config.cloudevents.address=http://falco-event-listener
Verify that everything is working as expected:
$ kubectl get pods --namespace falco
NAME                                      READY   STATUS    RESTARTS   AGE
falco-event-listener                      1/1     Running   0          5m19s
falco-falcosidekick-5854669c76-ddvrv      1/1     Running   0          2m16s
falco-falcosidekick-5854669c76-rdlqn      1/1     Running   0          2m16s
falco-falcosidekick-ui-7c5fc8dd54-q4qh9   1/1     Running   0          2m16s
falco-vkl4f                               1/1     Running   0          2m16s
Test
To test this, we have to connect a shell within the container.
Let's list the pods that we already have.
$ kubectl get pods
NAME                                 READY   STATUS    RESTARTS   AGE
alpine-deployment-77789455d6-m7flp   1/1     Running   15         3h6m
alpine-deployment-77789455d6-v7fkw   1/1     Running   15         3h6m
podinfo-6df788c7b8-gs5qb             1/1     Running   0          3h28m
podinfo-6df788c7b8-sfxvd             1/1     Running   0          3h28m
Now, run the following command to connect a shell.
$ kubectl exec -ti alpine-deployment-77789455d6-m7flp -- sh -c "uptime"
19:35:58 up  3:04,  load average: 3.12, 1.91, 1.22
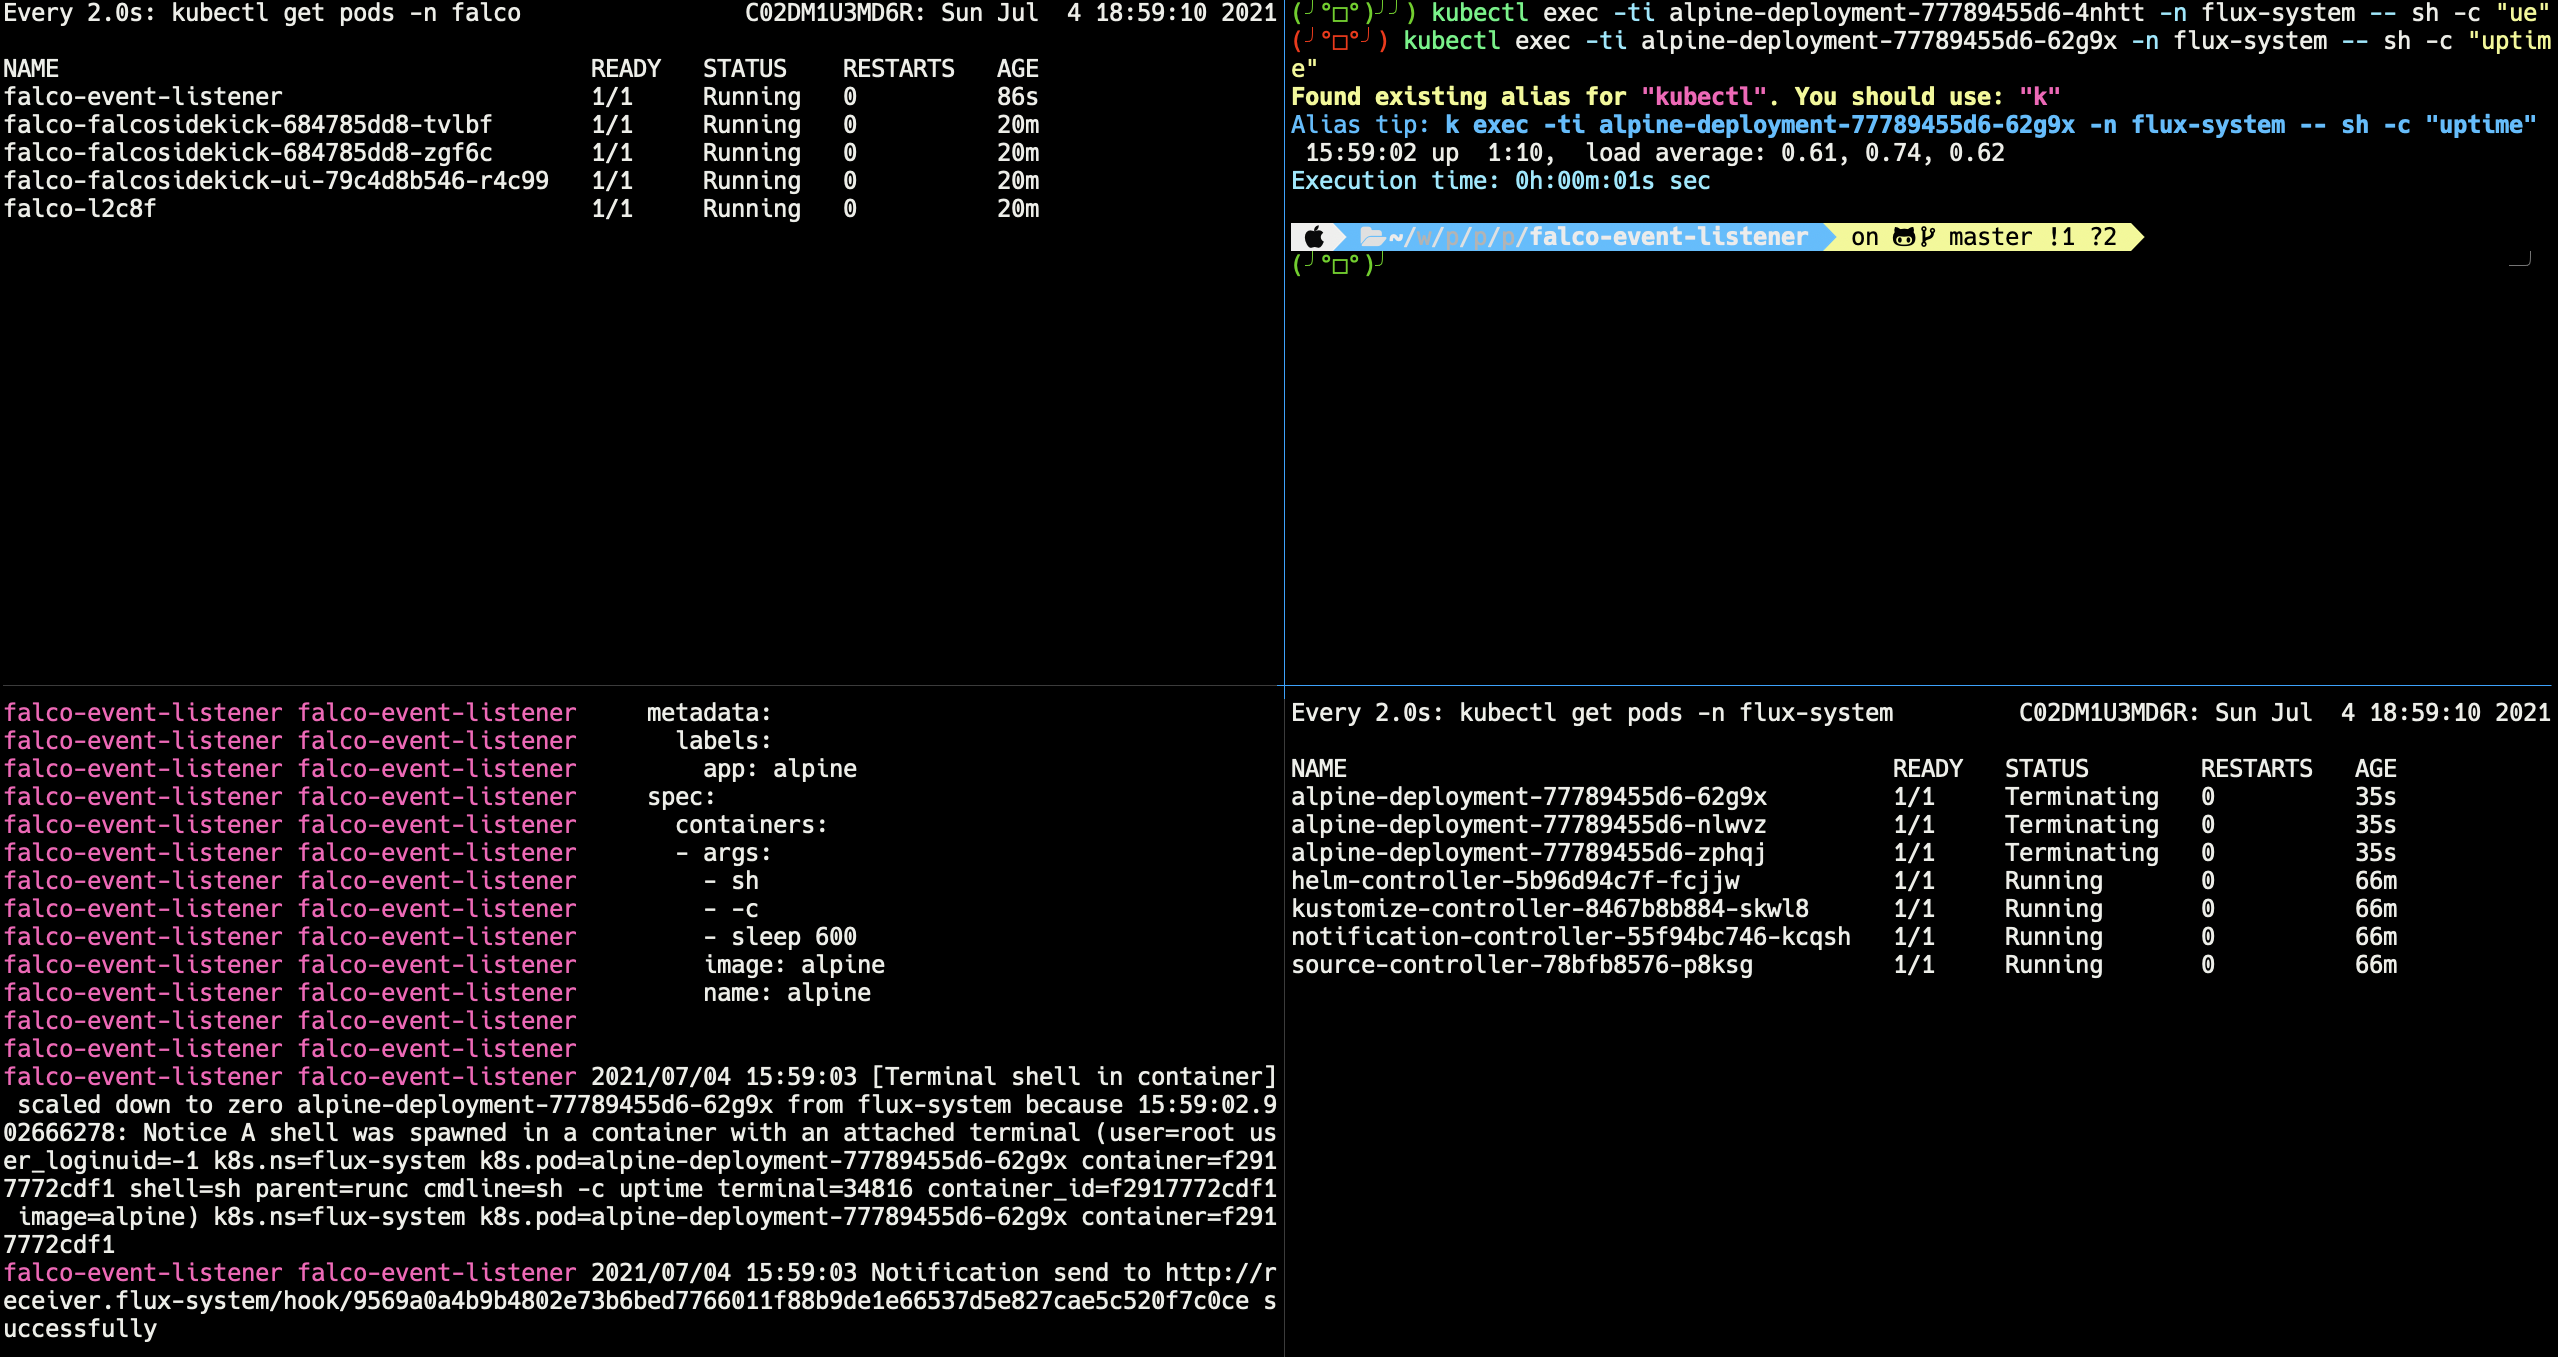
Once you run the command above, Falco will detect that malicious behavior and send it to the Falcosidekick via HTTP.
You should see an output in the Falco logs as given below:
{"output":"19:35:58.532086161: Notice A shell was spawned in a container with an attached terminal (user=root user_loginuid=-1 k8s.ns=default k8s.pod=alpine-deployment-77789455d6-m7flp container=788861c3cf83 shell=sh parent=runc cmdline=sh -c uptime terminal=34816 container_id=788861c3cf83 image=alpine) k8s.ns=default k8s.pod=alpine-deployment-77789455d6-m7flp container=788861c3cf83","priority":"Notice","rule":"Terminal shell in container","time":"2021-06-13T19:35:58.532086161Z", "output_fields": {"container.id":"788861c3cf83","container.image.repository":"alpine","evt.time":1623612958532086161,"k8s.ns.name":"default","k8s.pod.name":"alpine-deployment-77789455d6-m7flp","proc.cmdline":"sh -c uptime","proc.name":"sh","proc.pname":"runc","proc.tty":34816,"user.loginuid":-1,"user.name":"root"}}
and the similar output below in the Falcosidekick logs:
falco-falcosidekick-5854669c76-ddvrv falcosidekick 2021/06/13 19:51:45 [INFO] : CloudEvents - Send OK
and the similar output below in the falco-event-listener logs:
falco-event-listener falco-event-listener 2021/06/13 19:35:59 resp.Status=200 OK
falco-event-listener falco-event-listener 2021/06/13 19:35:59 resp.StatusCode=200
falco-event-listener falco-event-listener 2021/06/13 19:35:59 [Terminal shell in container] scaled down to zero alpine-deployment-77789455d6-m7flp from default because 19:35:58.532086161: Notice A shell was spawned in a container with an attached terminal (user=root user_loginuid=-1 k8s.ns=default k8s.pod=alpine-deployment-77789455d6-m7flp container=788861c3cf83 shell=sh parent=runc cmdline=sh -c uptime terminal=34816 container_id=788861c3cf83 image=alpine) k8s.ns=default k8s.pod=alpine-deployment-77789455d6-m7flp container=788861c3cf83
You should also notice that a new commit is available in the desired-state-repository as given below:
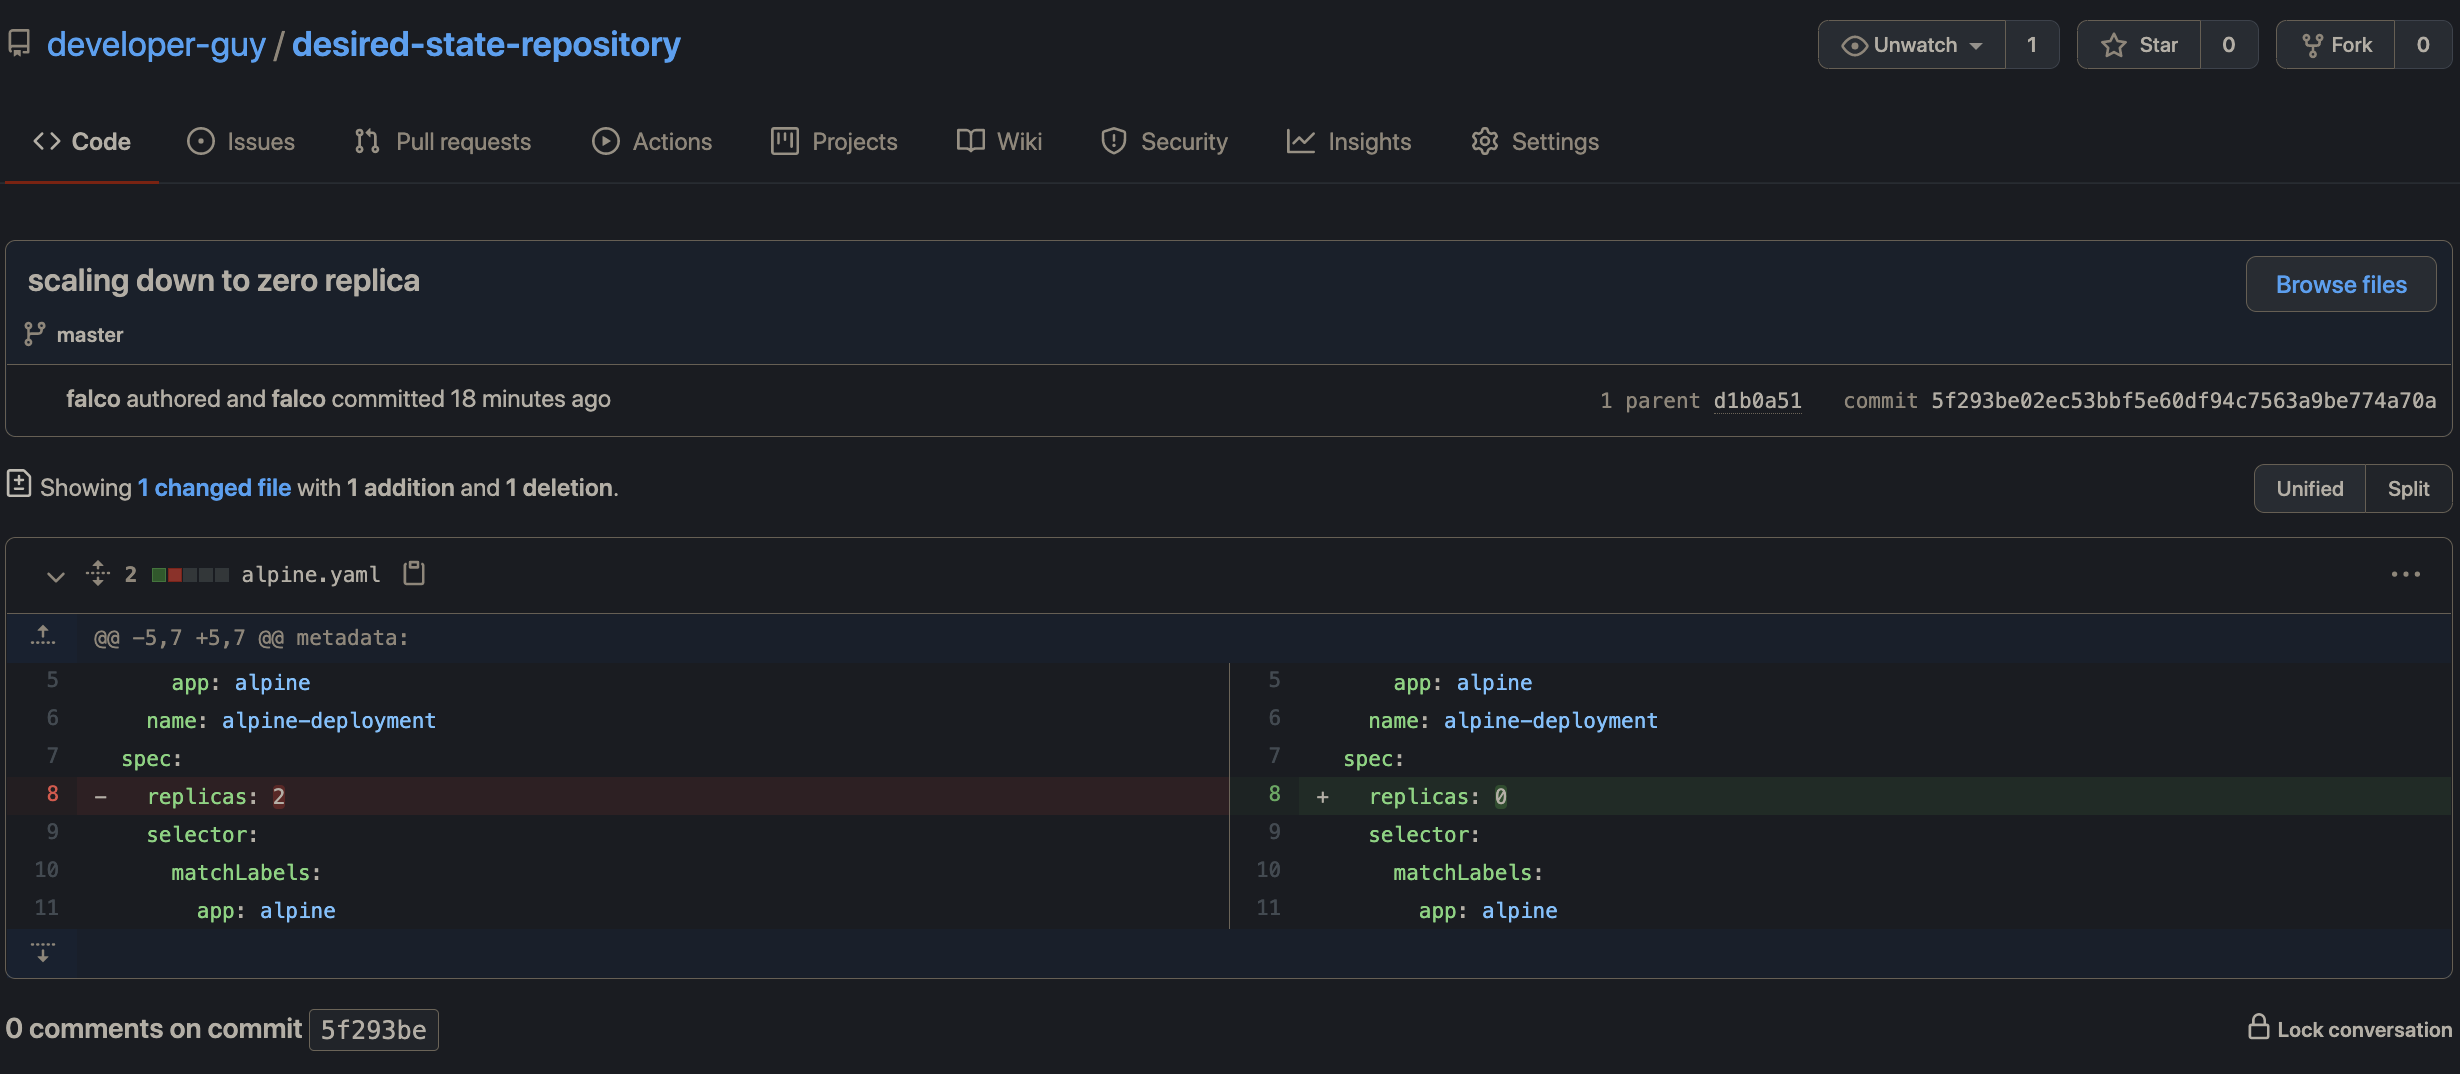
After the commit, Flux (version 2) will detect the change and sync the current state of the cluster with the desired state in the GitHub repository so that Flux (version 2) will terminate the alpine deployment pods.
$ kubectl get pods -l app=alpine
No resources found in default namespace.